Cutting and Building a Round Farmhouse Table
Original Post: June 2016
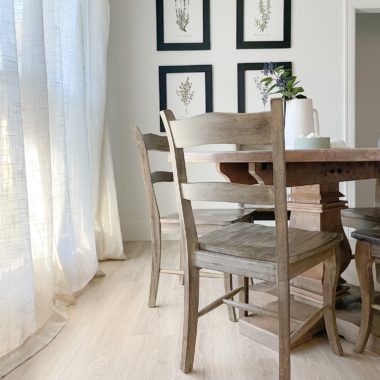
We have a small dining room area that is separate from the kitchen and living room. The area is much smaller than our last house so our typical rectangular farm house table was not going to cut it. The moment I walked in this house, I knew we needed to build a round table. I still loved the farmhouse design we usually went with, though. Because I wanted to incorporate that into my round table, I searched high and low for farmhouse style plans. With little success, I decided to mimic what I saw visually online and build one on my own.
My intention was simply a dining room table. Dining tables seem to be my forte’ and in the past, unless I specifically tell Bryce NOT to sell it, I usually get a phone call that we sold our dining table on Craigslist and then I am out a table for a few more weeks until I can find the time to build another one. Yeah, we live life on the edge.
What You Will Need:

Let the Wood Cutting Begin
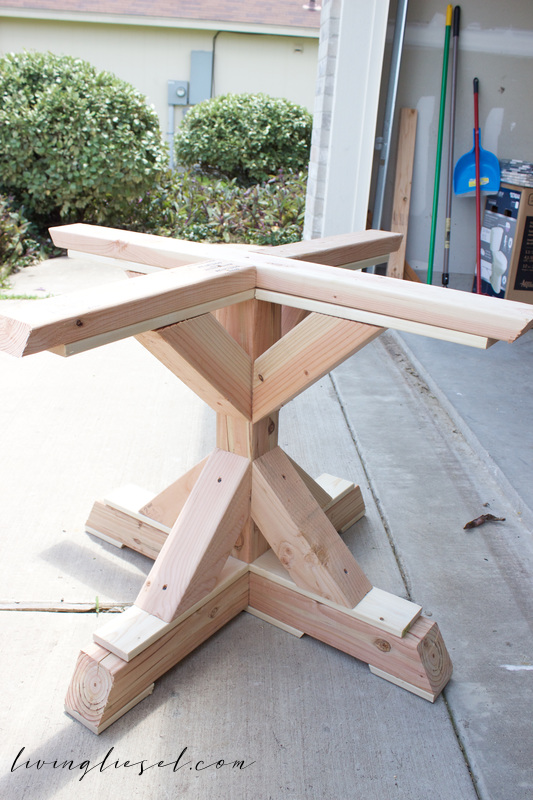
I started out by making all of my cuts for the base. The base is layer upon layer so it is incredibly sturdy. It is a centered cross base with a V-shaped decoration. I went through my cut list and stacked everything that was the same size together. The only way I can get through my projects is if I stay organized. I am constantly sweeping and stacking.

Next I started Kreg jigging the pieces I needed to attach together. If you plan on building any kind of furniture, you will need a Kreg Jig. It has been the best investment in my adult life. The picture below is of the brace that goes directly under the table top.

Below are the braces that I cut at a 45* angle for the V-shape and upside down V-Shape. This is why you need a miter saw instead of just a basic hand saw. Confession: I actually ended up having to take apart the entire table after I finished it and trim these down because they were not cut straight which caused the tabletop to sit crooked. My recommendation here is to double check your work to ensure it is square before screwing it in.

After I had all the pieces cut for the base, I put it together to get an idea of how big I really wanted the top. I had to screw the angled pieces into the bases. None of these were kreg jigged at this time.
Then I moved on to the round table top.
I wasn’t certain exactly how big I wanted the round table. I didn’t have a table in the space before this one so I was starting fresh. After doing a simple Google search and I decided on making it a custom size of 40″ around. I wanted to fit 5 people comfortably. Next, I measured each board and made 4 pieces of each size to go with each section. I had to kreg in multiple spots in order for it to be sturdy enough. All the little divets in the picture below are spots where I had to kreg screw.

Assuming everything is perfectly square, your cuts should be easy and you can streamline the cutting process by cutting small interior sections at a time. If you are new to DIY, you may want to measure and cut to fit within each quadrant. I measured each section to fit because I wanted each section to fit like a glove.
The round table top started out with a cross beam made from a couple 2 by 4’s. I kregged them together and measured the distance between each slot and cut one by one like I mentioned above. When I was finished, it looked like the picture above. Notice all of the divets where I kregged? I wanted to ensure the table was rock solid.
Notice that Extra Board?
YOU NEED IT.
You will see an extra board on each side in that picture above. It looks out of place but it was absolutely necessary. If you look closely, you can see there was an extra inch or so of board needed for the edges of the circle based on the size I wanted. You should see the circle outline that I did a rough sketch of.
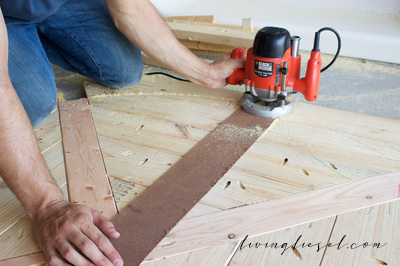
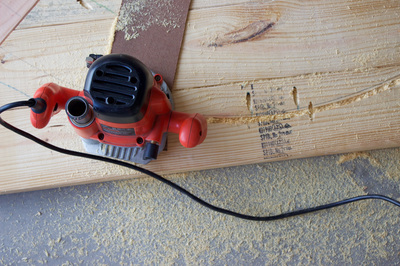
Next was the final cut on the round table. I was a little nervous to use the router for the first time so I asked my husband to do it. We used a spare piece of plywood to create a guide.
Since then – we have purchased a used band-saw on Craigslist. They are a bit expensive but SO WORTH the cost if you are an avid builder. Look below to see a video tutorial for how to cut a round table top with a band-saw.
How to Cut a Round Table Top
On to My Favorite Part!
Once the table top was cut I was able to do my favorite part! Sand!! not. I hate sanding with a burning fiery passion. My favorite part is staining when you get to see your piece come to life! *Sigh* But I have finally begun to understand how important it is. I sanded with an orbital sander with 120 grit sandpaper to start. Once I had a rough coat on everything, I went back through with 220 grit sandpaper.
YAY STAIN! Minwax is my Go-To.
You can see below that I am wiping it on with a cloth. I really like this stain when it is a bit lighter so I wipe it on instead of painting it on. The stain I am using is Early American and you can get it at Home Depot. I used a quarter of the one quart-can but I use this stain on everything so I can never have too much!

After I put it together I painted a quick coat of polyurethane to give it some protection and shine. On this table I used an oil based poly from Minwax. Oil based gives it some gloss, has a stronger smell, and takes a little time to dry. Since then, I have fallen in love water based polyurethane. It dries with a more matte finish and dries a million times faster than the oil based stuff.
After the oil based poly dried, I gave it a couple days to cure and then I sanded it again, lightly, with 220 grit sand paper (just the table top) with an orbital sander.
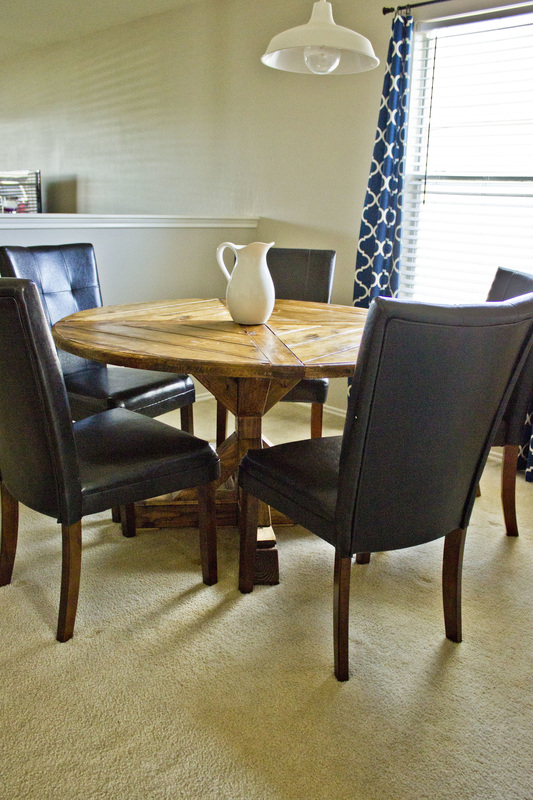
I was very pleased with the end result.


On to the next project of ripping out that half wall and doing the floors! Speaking of floors, if you want to see the before pictures in Meredith Lane, check them out here! This was our first foreclosure purchase and it needed a whole house renovation. If you are curious about buying a foreclosure, you can read more about the process for that here!


Any tips on outlining the perfect circle? Please tell me how yours ended up so perfect!
Slow and steady! We screwed a board to the exact center of the top and drew a practice line with it. Once we were ready to brave it, we went all in, no turning back with the router. I would recommend a practice cut or two on a smaller set of wood!
Would you happen to have the step by step instructions for the base? Measurements and how you put it together? I’d love to use this base but am having a hard time getting the measurements correct.
Hey there! When I cut the angled pieces to make the x-base, I would cut them to fit – meaning before making a single cut, I would shove it up in the base to determine a tight fit. There were times I had to trim off a 1/8 of an inch or so in order to make it fit tightly. If you make the cut and it leaves a bit of a gap, you can always use wood filler to seal the gap. I hope this helps!
Hi! Exactly how many of each size wood did you get? Thank you!
Hi! I realized long after I posted this I didn’t write those very important things down. Lesson learned! When I built the base, I followed Ana White’s plans for the pedestal base here: https://www.ana-white.com/woodworking-projects/4×4-x-base-pedestal-dining-table-planked-wood-top
I love this so much! I want to do it! What are the dimensions? I need to make sure it will fit in our space
Hi! I made a round 40″ top to fit 5 people comfortably. The base plans and dimensions can be found here through Ana White! https://www.ana-white.com/woodworking-projects/4×4-x-base-pedestal-dining-table-planked-wood-top
Your table is beautiful. Inspiring for a DIY’er.
What were the sizes of your 4×4’s for the “V” and how wide is your base?
Hello! Thank you so much! Here is a link for similar plans I followed back when I did it. Ana White has a TON of wonderful DIY woodworking plans! https://www.ana-white.com/woodworking-projects/4×4-x-base-pedestal-dining-table-planked-wood-top
Hello I am in the process of making this round table I am on the round top What was the the length of your 2×4 I cut mine 48 inches and barely fit 3 2×6 in each triangle section and I noticed you have 5
Hi! Unfortunately, since it’s been so long since I made this table (and original post) I don’t recall the measurements of the top. I would recommend checking out Ana White’s original plans. Mine was modified slightly to accommodate a round top instead of a square top. I hope this helps!
I’ve looked, but can you provide a list of the materials you used? or how I can get them? My daughter-in-law would like me to build this for her. Thank you.
Hi there John! I used this list on Ana White’s website for the materials. I believe I needed a bit fewer pieces for the top since my top was round. https://www.ana-white.com/woodworking-projects/4×4-x-base-pedestal-dining-table-planked-wood-top
Beautiful table. Do you have plans?
https://www.ana-white.com/woodworking-projects/4×4-x-base-pedestal-dining-table-planked-wood-top
I used Ana White’s plan for the base and similar concept for the top but used a router to cut mine round!